 Affiliate Setup and Management
![]()
 Overview
OpsAdmin enables suppliers to manage third-party affiliates by providing tools for pricing management, contract approvals, commission tracking, and web customization. Affiliates are set up through the Affiliate Manager, where key details such as promo codes, commission plans, and market regions are configured. Additional settings allow for tracking, billing integration, and communication management. For pricing and prospect submission, affiliates are assigned margin limits, commission structures, and customer enrollment settings. Once a prospect package is generated and contracts are signed, the system automatically updates the status, ensuring a streamlined and efficient affiliate management process. This document is specific to the setup of Affiliates.
 Key Features
![]()
Ops Admin offers the following features for managing affiliates:
- Emailing matrix pricing files to brokers (affiliates)
- Submission of contract deals for review and approval
- Web promo code setup
- Web pricing for specific affiliates
- Web customization
- Commission value submission
- Autopay requirement override
- Affiliate communications
The functionality your organization utilizes will determine how affiliates should be set up and which fields are required. Below is a step-by-step guide for setting up affiliates within Ops Admin.
 Setting Up an Affiliate
![]()
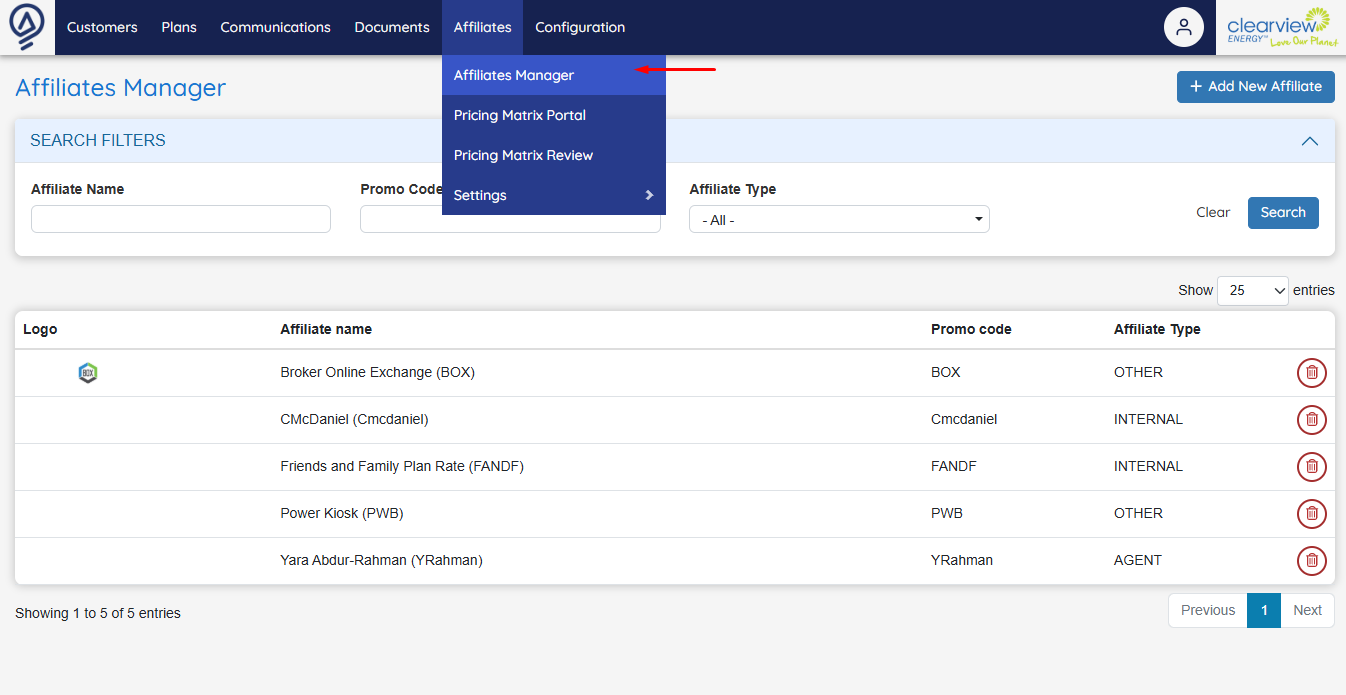
 1. Accessing Affiliate Management
- Navigate to the “Affiliates” menu.

- Click on “Affiliate Manager”
- Select “Add New Affiliate” on the right side of the screen.

 2. Enter Affiliate Information
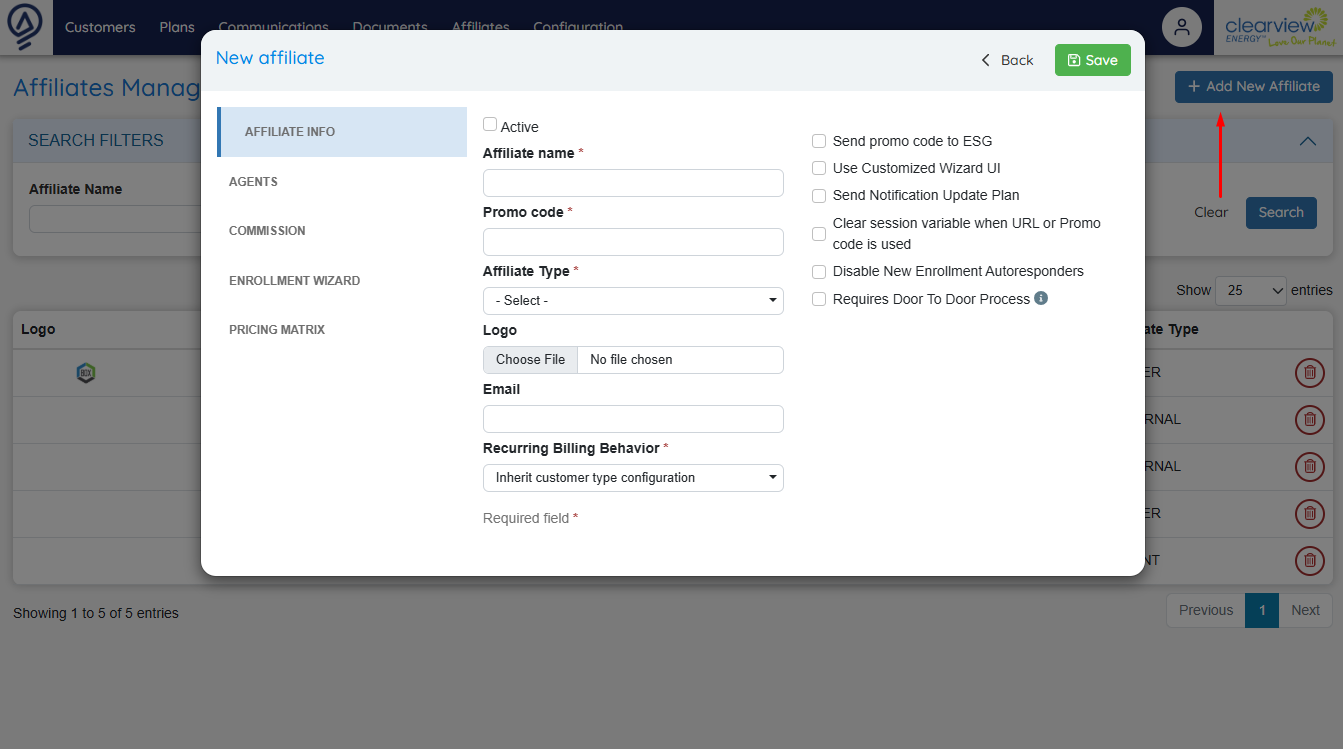
The following fields are available to be filled out during the process of setting up an Affiliate. All of the fields are associated with the full OpsAdmin system. The fields that have a white background are specifically used for the Prospect and Pricing Matrix system.
 Affiliate Information / Agents
| Field Name | Description | |
|---|---|---|
| Active (Affiliate) | Enables or disables the affiliate. | |
| Affiliate Name | Broker or affiliate company name. | |
| Promo Code | Promo code associated with the broker. | |
| Affiliate Type | Identifies the type (e.g., Agent, Internal, Market Site). | |
| Logo | Displays in the Pricing portal as an identifier. It is also used in the web enrollment journey if the affiliate can “private label | |
| Affiliate’s contact email. | ||
| Recurring Billing Behavior | Specifies if autopay is required or optional. | |
| Send promo code to ESG | Sends an ESG promo code to the billing system. Overrides plan-level billing promotions. | |
| Use Customized Wizard UI | Allows custom enrollment wizard (not currently used). | |
| Send Notification Update Plan | Notifies changes to affiliate-associated plans when a parent plan is updated. | |
| Clear session variable when URL or Promo code is used | Prevents tracking conflicts. | |
| Disable New Enrollment Autoresponders | Suppresses automatic email notifications. Emails are sent to the Company’s default email address instead. | |
| Requires Door To Door Process | Configures the affiliate for door-to-door sales. | |
| Send Notification Update Plan | [Already specified above, is there a reason for being duplicate?] | |
| Affiliate URL | Dedicated web address for the affiliate's enrollment portal. |
 Agents
| Field Name | Description | |
|---|---|---|
| Master Code | ESG Master Code mapping (used for Channel). | |
| Agent Code | ESG Agent Code mapping (used for Broker/vendor). | |
| Use Sub-Agent Code from Profile | If checked, the system will ignore the Sub-Agent in the Affiliate area and use the Sub-Agent field from a User Profile. | |
| Default Sub Agent Code | ESG Sub Agent Code mapping. | |
| Sub Agents | Add Sub-Agents to the Affiliate and their Sub-Agent code so that when a sale from that sub-agent occurs, the information can be passed to the billing system. | |
| Send Master code, Agent code or Sub-agent code to the Billing system | These three checkboxes determine if the information will be passed to the billing system. |
 Commission Settings
| Field Name | Description | |
|---|---|---|
| Commission Plan | ESG Commission Plan mapped to ESG. | |
| Commission 2 Plan | Default commission value (can be overridden via batch file). | |
| Commission Start & End Dates | Defines commission periods. | |
| Clawback Periods | Specifies commission clawback conditions. | |
| Commission Agent, Master, Sub-Agent Unit Numbers | Tracks commission distribution levels. |
 Promo & Web Customization Fields
| Field Name | Description | |
|---|---|---|
| Promo Code Benefits Description | Displays benefits of the promo code (not currently used). | |
| Wizard Zip Pop-Up Text | Custom text for promo-related ZIP code searches. | |
| Wizard Custom Options (Text & Image Path) | Custom UI options for the enrollment wizard. |
 Pricing Matrix/Portal
| Field Name | Description | |
|---|---|---|
| Maximum Margin ($) | Defines the maximum margin for pricing. | |
| Split Limit ($) | Limits margin split between parties. | |
| Affiliate Split Ratio (0-1) | Determines revenue split percentage. | |
| Electricity & Gas Markets | Defines markets the affiliate operates in. | |
| Mail Distribution | Enables email-based distribution of affiliate deals. |
 Setting Up an Affiliate for Matrix & Prospects
![]()
- Navigate to the “Pricing Matrix” tab in the edit affiliate section.
- Set “Maximum Margin ($)” to the agreed amount.
- Under “Markets,” select the states and move them to the “Associated” column.
| Steps | |
|---|---|
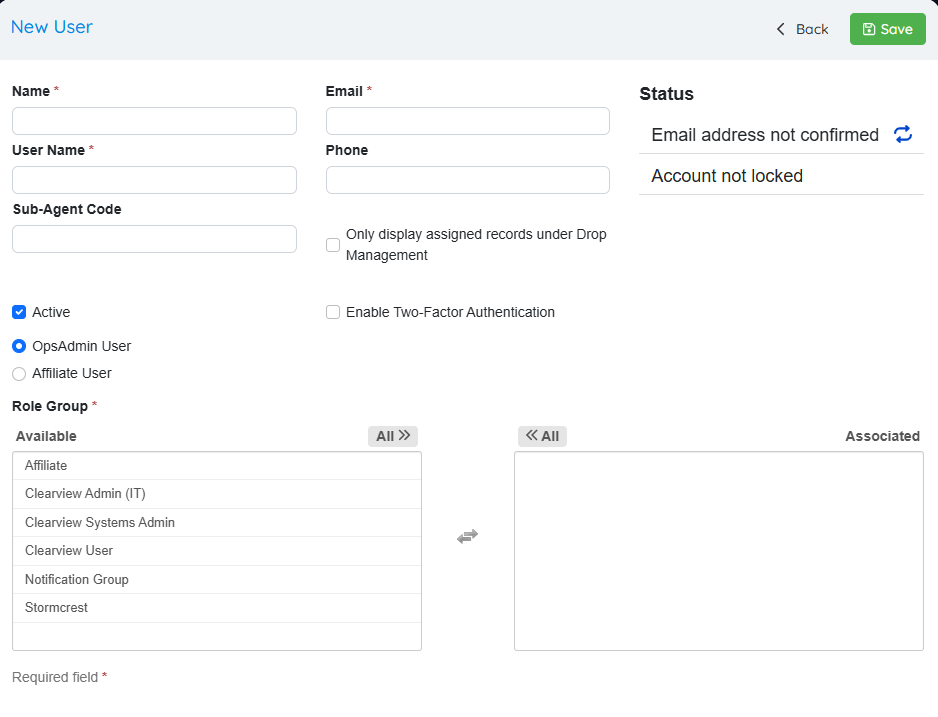
| 1. Under “Configuration,” go to “User Manager.” 2. 3.  |
|
- Under “Affiliates” menu, select “Pricing Matrix Portal”
- Login with your credentials
- Filter for the pricing based on Market, Utility, Load Zone, Customer Type and Rate Code. You may also sort by Usage Tier.
- Under “Add Broker Commission,” enter the additional commission for the prospect.
- Select a price and term length

Click “Generate” to create the prospect package.
- Under “General Information” enter the required details.
- Under “Customer Information” enter required details.
- If Status is set to “OnHold” you may review the details before submitting the Prospect to Generate the Contract. If set to “Created”, the contract will be generated and sent to both parties when saved.
- In “Prospect List,” the Affiliate may see the status of the prospect.
- Once the contract is signed, you’ll receive a notification.
- After all parties sign, the contract status updates automatically in the “Prospect Manager” (OpsAdmin) and “Prospect List” (Pricing Portal) to Completed.